 Deutsch
  English
 Installing VirtueMart 4 – JTL WaWi Connector in Joomla 5
Installing the VirtueMart 4 – JTL WaWi Connector in Joomla 5 is a simple but important step to utilize the full functionality between your online shop and the JTL-WaWi ERP software. This guide will help you step-by-step with the installation and activation of the component.
Prerequisites for Installation
Before you begin installing the VirtueMart 4 – JTL WaWi Connector, make sure you meet the following prerequisites:
- Joomla 5 is correctly installed on your server and running smoothly.
- You have already installed and configured the VirtueMart 4 component on Joomla.
- You have downloaded the Connector file of the VirtueMart 4 – JTL WaWi Connector from our website.
Step 1: Access Joomla 5 Backend
Log in to the backend of your Joomla 5 installation by entering the URL http://your-domain.com/administrator in your browser. Use your administrator username and password to access the Joomla dashboard.
Step 2: Upload Extensions and Create Joomla Backup
Before proceeding with the installation, you should definitely create a complete backup of your Joomla website. This ensures that you can quickly restore to the previous state in case of an error or incompatibility.
Creating a Joomla Backup:
- Use a backup extension such as Akeeba Backup (one of the most commonly used Joomla backup extensions). This extension creates a complete backup of your website, including the database and all files.
- Install the extension (if not already installed):
- In the Joomla backend, go to Extensions > Manage > Install.
- Download the Akeeba Backup ZIP package and install it like any other extension.
- After installation:
- Go to Components > Akeeba Backup.
- Click on Backup Now to create a complete backup of your Joomla installation.
- Save the backup file securely on your computer or external storage location.
Uploading Extensions:
After creating the backup, you can proceed with the installation:
- In the Joomla dashboard, go to the menu item Extensions and select Manage > Install.
- Under the Upload Package tab, you can select the previously downloaded VirtueMart 4 – JTL WaWi Connector ZIP file.
- Click on Upload & Install to transfer the file to your server and install the component.
Why a Joomla Backup is Important:
By creating a backup, you secure your Joomla website before making new extensions or changes. Should something go wrong during installation (e.g., incompatibilities or server problems), you can always fall back to the previous version of your website and quickly restore operations.
This guide adds the important step of backing up before installation to ensure you keep your website safe before installing new extensions like the VirtueMart 4 – JTL WaWi Connector.
Step 3: Verify Installation
After successful installation, a confirmation message will be displayed. You can verify the installation by clicking on Extensions > Manage > Installed extensions in the menu and searching for VirtueMart 4 – JTL WaWi Connector. The component should be displayed here as active.
Step 4: Configure VirtueMart 4 – JTL WaWi Connector
After the component has been successfully installed, the next step is to establish the connection between JTL-WaWi and your VirtueMart shop. This enables synchronization of orders, inventory levels, and customer data between the two systems.
1. Open the JTL WaWi Connector
Navigate in your Joomla backend to Components > VirtueMart > JTL WaWi Connector.
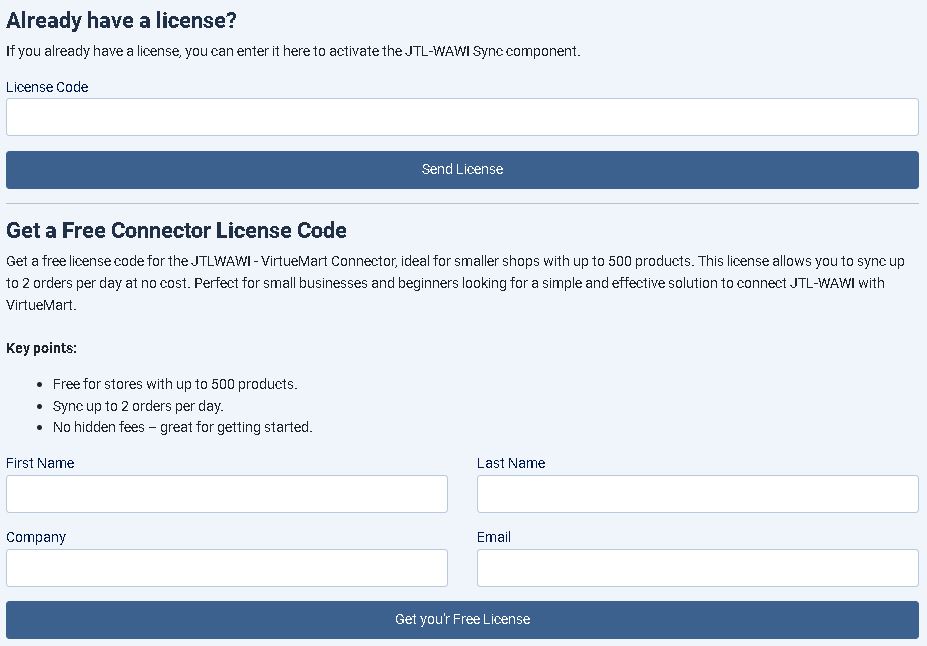
2. Activate License
If you already have a license key, enter it in the License Code field and click the Send License button to activate the component.
If you don't have a license yet, you can obtain a free license through the provided form by entering your First Name, Last Name, Company, and Email. Then click Get your Free License.
Licensing is done through the VirtueMart JTL Connector. Note the steps and activate your license.
3. .htaccess Configuration (if required)
If you receive an error message regarding URL reachability (e.g., "The URL is not reachable"), you may need to adjust your .htaccess file to ensure the URL is correctly resolved.
- Open the .htaccess file located in the root directory of your Joomla installation.
- Add the following rule directly after the line
RewriteEngine On:
- Save the file and upload it to your server.
- Test the URL again to ensure the redirect now works correctly.
4. JTL-WaWi Configuration
In the JTL-WaWi Configuration section of the connector, you will see the necessary connection data that must be entered in JTL-WaWi:

- JTL Shop URL: This is the URL of your VirtueMart shop. This URL connects JTL-WaWi with your VirtueMart
- Sync Username: This username is used for synchronization between JTL-WaWi and VirtueMart.
- Sync Password: This is the associated password for the synchronization user. It is individually created with each installation.
5. Configure in JTL-WaWi
- Open the Sales Channel Management in JTL-WaWi.
- Select the appropriate sales channel (e.g., Online Shop - JTL-Shop).
- Switch to the Web Server tab and enter the connection data:
- JTL Shop URL: Enter the URL of your VirtueMart shop here as displayed in VirtueMart (e.g.,
http://j4vm4.testserver.com). - Sync Username: Enter the synchronization username created in VirtueMart (e.g.,
jtl_conn). - Sync Password: Enter the associated password you received in VirtueMart for this user.
- Click Test Connection to ensure the connection between JTL-WaWi and your VirtueMart shop was successfully established.
Important Notes:
- The username and password data for synchronization are individually generated with each installation. Therefore, use the specific data displayed in your VirtueMart backend.
- JTL-WaWi does not connect directly to the VirtueMart database, but via the web server connection (via the Shop URL) to the VirtueMart component.
- If you have problems with URL reachability, make sure your .htaccess file is correctly configured and that the mod_rewrite module is enabled on your web server.
With these steps, you can easily establish the connection between JTL-WaWi and your VirtueMart shop and ensure automatic synchronization of orders and inventory levels.
Step 5: Testing the Connection and Synchronization
After all settings have been made, it is important to test the connection between VirtueMart and JTL-WaWi to ensure that synchronization works smoothly. Proceed step by step and check the following areas:
1. Test Order in VirtueMart
Create a test order in your VirtueMart shop and verify that the following data is correctly transferred to JTL-WaWi:
- Orders: Is the order correctly displayed in JTL-WaWi?
- Customer Data: Were customer data properly imported and assigned to orders?
- Inventory Levels: Were inventory levels for sold products automatically updated to prevent overselling?
2. Create New Products in JTL-WaWi and Synchronize
To ensure product synchronization works correctly, create a new product in JTL-WaWi:
- Create a new product with a product description, price, inventory level, and possibly images.
- Assign the product to an existing category or create a new category.
- Synchronize the product with your VirtueMart shop.
Then verify in VirtueMart:
- Is the new product correctly displayed in the VirtueMart shop?
- Are all product details such as price, description, images, and inventory levels correctly synchronized?
3. Create New Categories in JTL-WaWi and Verify
Create a new category in JTL-WaWi to test whether categories are properly synchronized with VirtueMart:
- Create a new category in JTL-WaWi and assign products to this category.
- Synchronize the categories and products with VirtueMart.
Verify in VirtueMart:
- Is the new category correctly displayed?
- Are the assigned products visible in the new category and fully synchronized?
4. Create New Customers in JTL-WaWi and Verify
Test customer synchronization by creating a new customer in JTL-WaWi:
- Create a new customer in JTL-WaWi, fill in the required fields such as name, address, email, and other relevant information.
- Synchronize the customer data with VirtueMart.
Verify in VirtueMart:
- Is the newly created customer visible in the VirtueMart customer database?
- Were all relevant data (name, address, email, etc.) correctly transferred?
5. Test Inventory Level Synchronization
Ensure that inventory levels are correctly synchronized between VirtueMart and JTL-WaWi:
- Increase or decrease the inventory level of a product in JTL-WaWi.
- Synchronize the data and verify that the changed inventory level is correctly displayed in VirtueMart.
Verify in VirtueMart:
- Was the changed inventory level correctly transferred to VirtueMart?
- Is the correct inventory level displayed in the shop to avoid overselling?
6. Troubleshooting Synchronization Issues
If errors occur during synchronization or certain data is not correctly transferred, check the following points:
- Connection Settings: Ensure that the connection between JTL-WaWi and VirtueMart is correctly configured.
- Database Synchronization: Verify that database synchronization settings between both systems are correct.
- Logs: Check the logs in JTL-WaWi and VirtueMart to identify any error messages.
Step 6: Troubleshooting Installation Issues
If errors occur during installation or configuration, you can check the following points:
- PHP Version: Ensure that your server supports the PHP version required by Joomla 5 and VirtueMart 4 (at least PHP 8.1).
- File Permissions: Verify that all folders on your web server have the correct read and write permissions.
- Joomla 5 Compatibility: Ensure that installed plugins and extensions are fully compatible with Joomla 5.
Conclusion
Installing the VirtueMart 4 – JTL WaWi Connector in Joomla 5 opens up numerous possibilities for optimizing your business processes. With automatic order transfer and real-time inventory synchronization, you can seamlessly connect your VirtueMart shop with JTL-WaWi and ensure smooth management of your orders and inventory levels. Follow the steps above to successfully complete the installation and efficiently run your e-commerce business.